# /etc/inittab init(8) configuration for BusyBox # # Copyright (C) 1999-2004 by Erik Andersen <andersen@codepoet.org> # # # Note, BusyBox init doesn't support runlevels. The runlevels field is # completely ignored by BusyBox init. If you want runlevels, use sysvinit. # # # Format for each entry: <id>:<runlevels>:<action>:<process> # # <id>: WARNING: This field has a non-traditional meaning for BusyBox init! # # The id field is used by BusyBox init to specify the controlling tty for # the specified process to run on. The contents of this field are # appended to "/dev/" and used as-is. There is no need for this field to # be unique, although if it isn't you may have strange results. If this # field is left blank, it is completely ignored. Also note that if # BusyBox detects that a serial console is in use, then all entries # containing non-empty id fields will _not_ be run. BusyBox init does # nothing with utmp. We don't need no stinkin' utmp. # # <runlevels>: The runlevels field is completely ignored. # # <action>: Valid actions include: sysinit, respawn, askfirst, wait, once, # restart, ctrlaltdel, and shutdown. # # Note: askfirst acts just like respawn, but before running the specified # process it displays the line "Please press Enter to activate this # console." and then waits for the user to press enter before starting # the specified process. # # Note: unrecognised actions (like initdefault) will cause init to emit # an error message, and then go along with its business. # # <process>: Specifies the process to be executed and it's command line. # # Note: BusyBox init works just fine without an inittab. If no inittab is # found, it has the following default behavior: # ::sysinit:/etc/init.d/rcS # ::askfirst:/bin/sh # ::ctrlaltdel:/sbin/reboot # ::shutdown:/sbin/swapoff -a # ::shutdown:/bin/umount -a -r # ::restart:/sbin/init # # if it detects that /dev/console is _not_ a serial console, it will # also run: # tty2::askfirst:/bin/sh # tty3::askfirst:/bin/sh # tty4::askfirst:/bin/sh # # Boot-time system configuration/initialization script. # This is run first except when booting in single-user mode. # ::sysinit:/bin/hostname -F /etc/hostname ::sysinit:/etc/init.d/rcS
# /bin/sh invocations on selected ttys # # Note below that we prefix the shell commands with a "-" to indicate to the # shell that it is supposed to be a login shell. Normally this is handled by # login, but since we are bypassing login in this case, BusyBox lets you do # this yourself... # # Start an "askfirst" shell on the console (whatever that may be) # ::askfirst:-/bin/sh # Start an "askfirst" shell on /dev/tty2-4 # tty2::askfirst:-/bin/sh # tty3::askfirst:-/bin/sh # tty4::askfirst:-/bin/sh
# Example of how to put a getty on a serial line (for a terminal) ::respawn:/sbin/getty -L ttyS000 115200 vt100 -n root -I "Auto login as root" #::respawn:-/bin/sh # # Example how to put a getty on a modem line. #::respawn:/sbin/getty 57600 ttyS2
# Stuff to do when restarting the init process ::restart:/sbin/init
# Stuff to do before rebooting ::ctrlaltdel:/sbin/reboot ::shutdown:/bin/umount -a -r ::shutdown:/sbin/swapoff -a
echo RUNLEVEL = $RUNLEVEL if [ $RUNLEVEL = 4 ]; then # Mount /var echo"Mount var as 80M" mount -nt tmpfs -o size=80M,mode=777 tmpfs /var cd /var mkdir lib lib/bluetooth lock log run tmp dhcpc empty empty/sshd db touch run/utmp log/wtmp chmod 755 empty cd - fi
partition_index roothome ROOTHOME=$? if [ "$ROOTHOME" -ne 255 ]; then echo"roothome=$ROOTHOME" else partition_index cache ROOTHOME=$? if [ "$ROOTHOME" -ne 255 ]; then echo"cache=$ROOTHOME" else ROOTHOME=255 echo"roothome=$ROOTHOME" fi fi if [ "$ROOTHOME" -ne 255 ]; then mount -t ext4 /dev/mmcblk0p$ROOTHOME /root if [ "$?" != "0" ]; then mke2fs -t ext4 -F /dev/mmcblk0p$ROOTHOME sleep 2 mount -t ext4 /dev/mmcblk0p$ROOTHOME /root echo"mount -t ext4 /dev/mmcblk0p$ROOTHOME /root" fi ROOTSIZE=`df | grep /dev/mmcblk0p$ROOTHOME | cut -b 45-50` fi
mount -t ext4 /dev/mmcblk0p17 /storage if [ $? -ne 0 ]; then mkfs.ext4 -T largefile -F /dev/mmcblk0p17 -q fi mount -t ext4 /dev/mmcblk0p17 /storage
sleep 1 WIFIID=`lsusb | awk -F'ID ''{print $2}' | fgrep "0e8d"` echo"$WIFIID" if [ "$WIFIID" == "0e8d:76a0" ] || [ "$WIFIID" == "0e8d:7662" ]; then echo"insmod /kmod/mt7662u_sta.ko" insmod /kmod/mt7662u_sta.ko if [ -d /sys/class/net/wlan0 ]; then touch /tmp/wifi_support_5G.txt fi else echo"No Internal WIFI Device" fi
if [ -x /hybroad/bin/usbmounter ]; then /hybroad/bin/usbmounter & fi
ifconfig eth0 up ifconfig wlan0 up
touch /root/.reboot cnt=`cat /root/.reboot` if [ -z ${cnt} ]; then cnt=0 fi
if [ $RUNLEVEL = 4 ]; then echo"Extract MicroHei.ttf to /var" tar xzf /hybroad/share/MicroHei.ttf.tar.gz -C /var # Start telnetd or sshd service if [ -x /usr/sbin/sshd ]; then echo"Start ssh service ..." /usr/sbin/sshd else echo"Can not find ssh server, then use telnet server ..." telnetd 2>/dev/null fi # Back upgrade tool if [ -x /hybroad/bin/back_upgrade.elf ]; then /hybroad/bin/back_upgrade.elf & fi fi
iftest -n $RUNLEVEL ; then cd /hybroad/bin while [ 1 ]; do case$RUNLEVELin 4) echo Starting factory test ... if [ -f /root/eWindow/eWindow.elf ]; then /root/eWindow/eWindow.elf else /hybroad/bin/eWindow.elf fi ;; *) if [ -x /hybroad/user.rc ]; then echo Starting user.rc ... /hybroad/user.rc else ifconfig eth0 10.0.0.188 broadcast 10.255.255.255 netmask 255.0.0.0 # Mount /var echo"Mount var as 80M" mount -nt tmpfs -o size=80M,mode=777 tmpfs /var cd /var mkdir lib lib/bluetooth lock log run tmp dhcpc empty empty/sshd db touch run/utmp log/wtmp chmod 755 empty cd - # Extract MicroHei.ttf echo"Extract MicroHei.ttf to /var" tar xzf /hybroad/share/MicroHei.ttf.tar.gz -C /var # Start telnetd or sshd service if [ -x /usr/sbin/sshd ]; then echo"Start ssh service ..." /usr/sbin/sshd else echo"Can not find ssh server, then use telnet server ..." telnetd 2>/dev/null fi fi break; ;; esac done fi
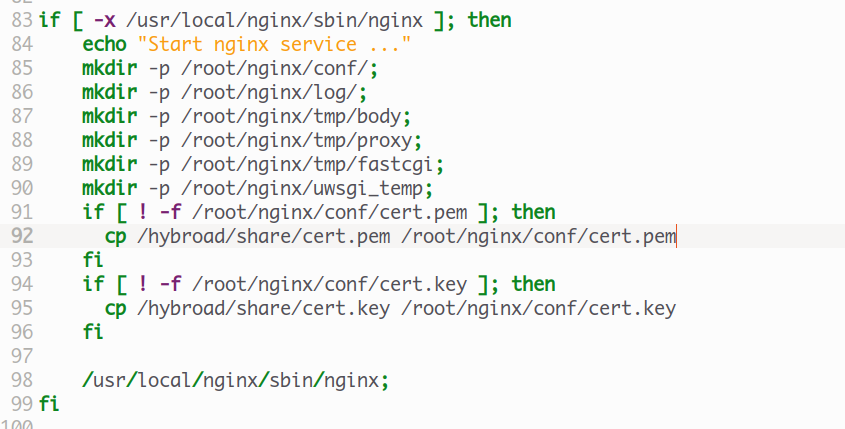
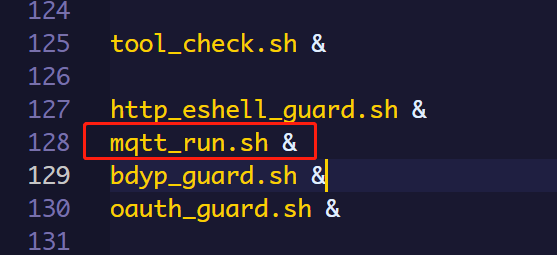
在这个脚本中也启动了更多的进程,如下
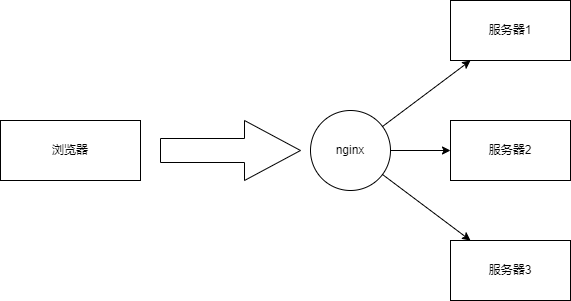
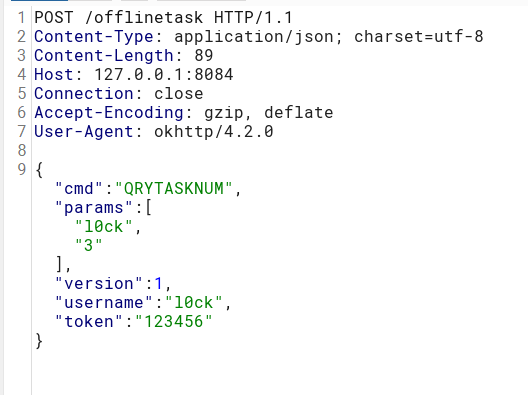
1 2 3
if [ -x /hybroad/user.rc ]; then
    echo Starting user.rc ...
    /hybroad/user.rc
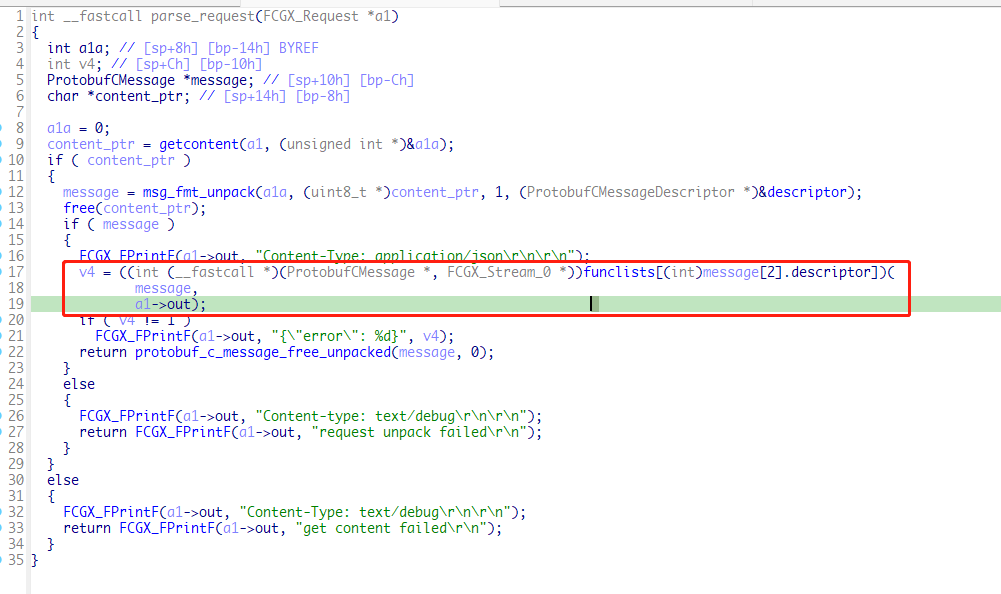
typedefstructFCGX_Request { int requestId; /* valid if isBeginProcessed */ int role; FCGX_Stream *in; FCGX_Stream *out; FCGX_Stream *err; char **envp;
/* Don't use anything below here */
structParams *paramsPtr; int ipcFd; /* < 0 means no connection */ int isBeginProcessed; /* FCGI_BEGIN_REQUEST seen */ int keepConnection; /* don't close ipcFd at end of request */ int appStatus; int nWriters; /* number of open writers (0..2) */ int flags; int listen_sock; } FCGX_Request;
structProtobufCMessageDescriptor { /** Magic value checked to ensure that the API is used correctly. */ uint32_t magic;
/** The qualified name (e.g., "namespace.Type"). */ constchar *name; /** The unqualified name as given in the .proto file (e.g., "Type"). */ constchar *short_name; /** Identifier used in generated C code. */ constchar *c_name; /** The dot-separated namespace. */ constchar *package_name;
/** * Size in bytes of the C structure representing an instance of this * type of message. */ size_t sizeof_message;
/** Number of elements in `fields`. */ unsigned n_fields; /** Field descriptors, sorted by tag number. */ const ProtobufCFieldDescriptor *fields; /** Used for looking up fields by name. */ constunsigned *fields_sorted_by_name;
/** Number of elements in `field_ranges`. */ unsigned n_field_ranges; /** Used for looking up fields by id. */ const ProtobufCIntRange *field_ranges;
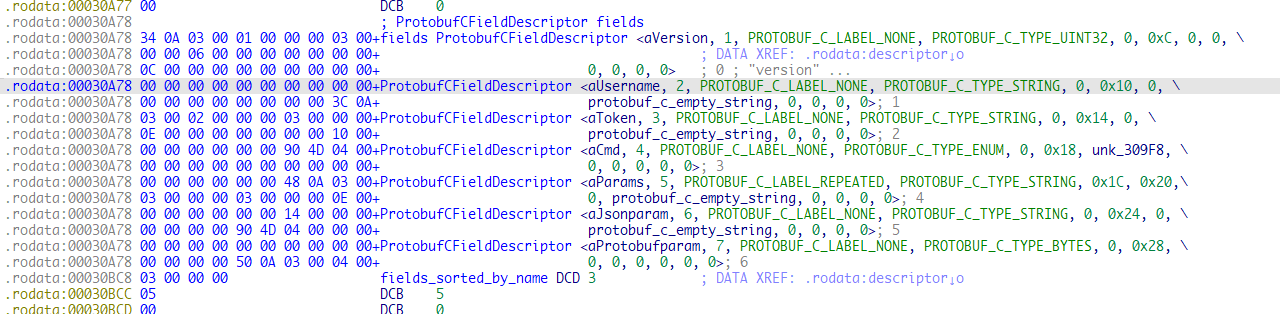
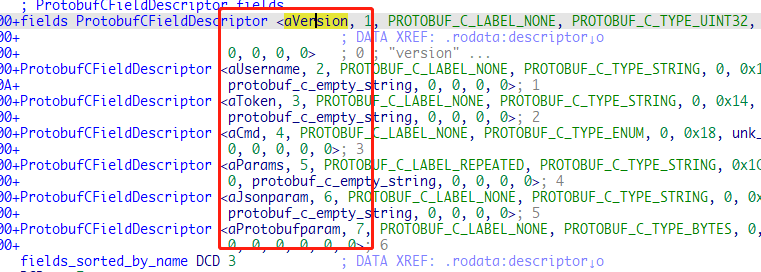
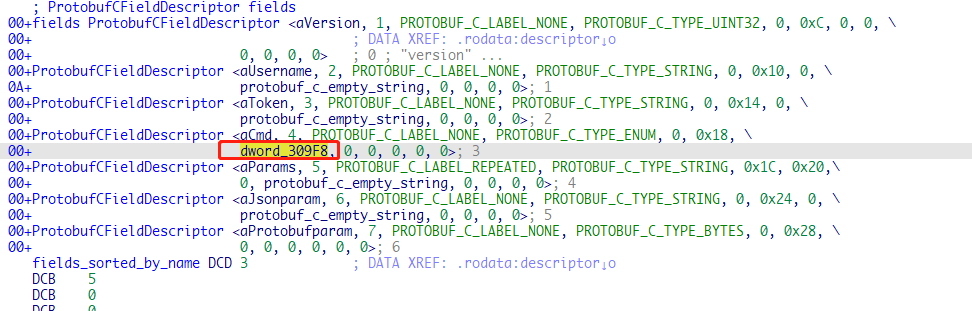
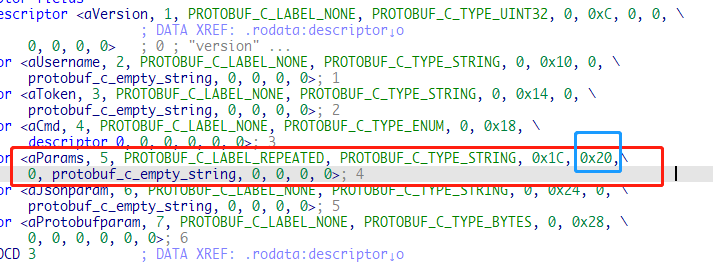
structProtobufCFieldDescriptor { /** Name of the field as given in the .proto file. */ constchar *name;
/** Tag value of the field as given in the .proto file. */ uint32_t id;
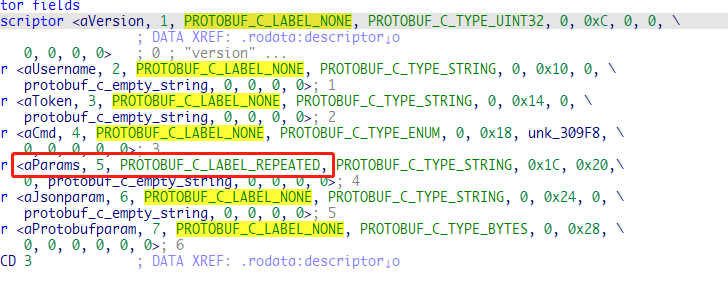
/** Whether the field is `REQUIRED`, `OPTIONAL`, or `REPEATED`. */ ProtobufCLabel label;
/** The type of the field. */ ProtobufCType type;
/** * The offset in bytes of the message's C structure's quantifier field * (the `has_MEMBER` field for optional members or the `n_MEMBER` field * for repeated members or the case enum for oneofs). */ unsigned quantifier_offset;
/** * The offset in bytes into the message's C structure for the member * itself. */ unsigned offset;
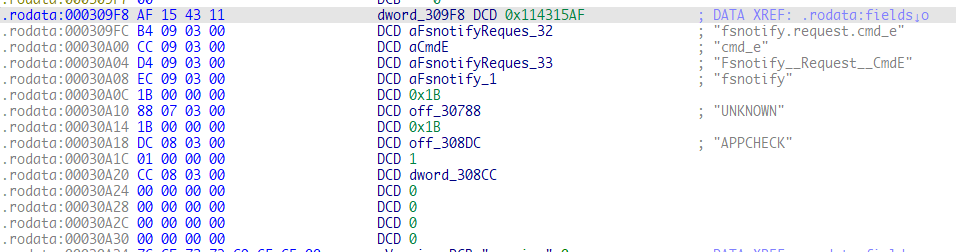
/** * A type-specific descriptor. * * If `type` is `PROTOBUF_C_TYPE_ENUM`, then `descriptor` points to the * corresponding `ProtobufCEnumDescriptor`. * * If `type` is `PROTOBUF_C_TYPE_MESSAGE`, then `descriptor` points to * the corresponding `ProtobufCMessageDescriptor`. * * Otherwise this field is NULL. */ constvoid *descriptor; /* for MESSAGE and ENUM types */
/** The default value for this field, if defined. May be NULL. */ constvoid *default_value;
/** * A flag word. Zero or more of the bits defined in the * `ProtobufCFieldFlag` enum may be set. */ uint32_t flags;
/** Reserved for future use. */ unsigned reserved_flags; /** Reserved for future use. */ void *reserved2; /** Reserved for future use. */ void *reserved3; };
/** * A type-specific descriptor. * * If `type` is `PROTOBUF_C_TYPE_ENUM`, then `descriptor` points to the * corresponding `ProtobufCEnumDescriptor`. * * If `type` is `PROTOBUF_C_TYPE_MESSAGE`, then `descriptor` points to * the corresponding `ProtobufCMessageDescriptor`. * * Otherwise this field is NULL. */ constvoid *descriptor; /* for MESSAGE and ENUM types */
structProtobufCEnumDescriptor { /** Magic value checked to ensure that the API is used correctly. */ uint32_t magic;
/** The qualified name (e.g., "namespace.Type"). */ constchar *name; /** The unqualified name as given in the .proto file (e.g., "Type"). */ constchar *short_name; /** Identifier used in generated C code. */ constchar *c_name; /** The dot-separated namespace. */ constchar *package_name;
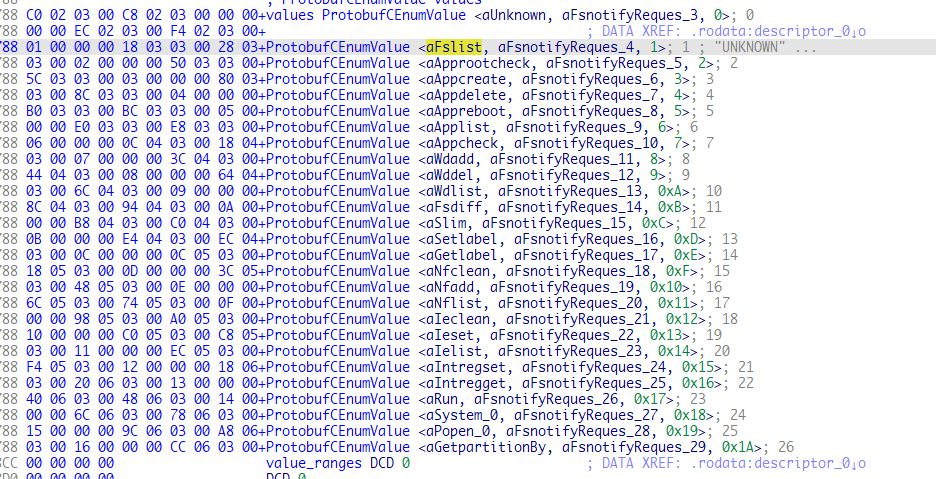
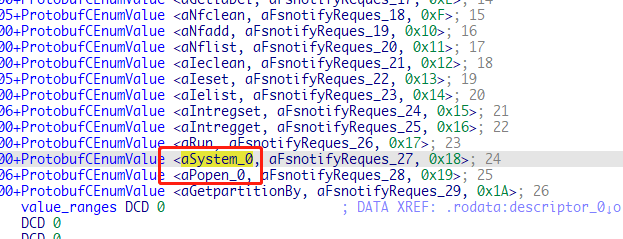
/** Number elements in `values`. */ unsigned n_values; /** Array of distinct values, sorted by numeric value. */ const ProtobufCEnumValue *values;
/** Number of elements in `values_by_name`. */ unsigned n_value_names; /** Array of named values, including aliases, sorted by name. */ const ProtobufCEnumValueIndex *values_by_name;
/** Number of elements in `value_ranges`. */ unsigned n_value_ranges; /** Value ranges, for faster lookups by numeric value. */ const ProtobufCIntRange *value_ranges;
/** Reserved for future use. */ void *reserved1; /** Reserved for future use. */ void *reserved2; /** Reserved for future use. */ void *reserved3; /** Reserved for future use. */ void *reserved4; };